


FREQUENTLY ASKED QUESTIONS
Ask away!
Frequently Asked Questions
How to Use Your Deployment Clasp on your N-Wave Watch
While this video shows the proper use of the deployment clasp, it does not show the release (undo) method. On the N-Wave, once fitted, simply squeeze the clasp’s side buttons to release the clasp.
How to Change Your Battery (Non Wrist Watches)
SR626SW (#377) Fits all 2035 and Super 2035 Citizen Movements. 99.9% of Formotion's gauges use this battery - including all OEM gauges (HD, VIC, URAL et al)
SR927SW ONLY for face dials with the imprint (words) Police SL and Vistrek Models only.
This battery is one of the most widely used batteries on the planet - that said, if you need it now, go to your local drug store and ask for one! They'll have it!! OR: To purchase from CLICK here:
Although we always recommend sending your gauge in to us for battery and O-ring service, it's just easier and inexpensive - not to mention done right! Go here to learn about our battery and O-Ring service: FACTORY BATTERY AND O-RING SERVICE
But if you want to do it yourself you can - it's really quite easy. Bellow is the instructions on how to identify your gauge type and how to change the battery.
For Battery Replacement you have a few options: The batteries are always located behind the rear case covers. All our clocks use standard replacement batteries easily found at most any drug or department store.
Depending on model, Formotion clocks use three types of methods to attach the rear case cover - knowing which one you have will aid you in removing it for battery replacement.
Press Fit Back: (Superleggera SL/IP Insert Type) As it sounds, this cover is a press fit into the clock case. There are no visible tool grabs or markings on the case back, but there probably is a small notch on its side. It's small and you need to look carefully. This notch is provided to place a small jewelers knife in between the case's back and the case itself and wedge or pop the back off with a twist of the knife while in this notch. This back is common with our Press Fit and set screw mounted clocks. If you are a DIY person, changing the battery with this case-back can be frustrating. Why? Because the case-back is easy to pop off but tricky to put back on. We use a special watch-press to snap the back back on the case, but it can be done with thumbs (not the palm of your hand - you'll break the crystal) Hold one end down in place with one thumb and slide and press with the other thumb the other side and PRESS. Be patient. We said it's tricky! Our advice: Send it to us to change the battery and o-ring or your local watch shop - it's inexpensive and you'll be so less frustrated.
Want a tool: Makes it sooo much esier and the tool is not expensive. Here’s the Amazon link: https://a.co/d/2CgdgNW
Screw-On Back: (See YouTube Video above) Most of our clocks use this type of case back. All our RSL, BP and GA series gauges use this type of back. It's easy to tell if you gauge has this type because the cases back will have 6 notches around it's edge. These notches are for use with a spanner wrench; by grabbing two of the notches with the spanner and "spinning" the case back off. Look to the internet if you want to purchase a spanner tool. Just make sure that the tool will accommodates (clears) the stem that protrudes for the case back you are changing. This screw-down case back is a very common type of watch back, and the Internet is full of tools and spanner wrenches to help you remove this type of back. EXAMPLE: (Vastar Company’s Spanner and Vice Show Below from Amazon $9)

Snap-Back Series Back: This back is can be recognized by the 4 or 6 screws holding the back down against the case. Using a small screwdriver, simply remove the screws and lift the back cover off to reveal the battery.
What's Next?
Once you remove the back of your Formotion clock, you'll notice a white plastic movement retainer. This retainer can and should be removed simply by lifting it out of the open case and setting it aside. Note that it is inwardly notched so as to clear the stem that reaches across to the movement. Just make sure you replace the retainer the same way as you took it out keeping this notch and stem in mind.
Looking at the battery, you will notice that it may be held in place by small side "lips" or a very small metal strap across the battery. In most cases using a small pick, you can nudge the battery out of its location. If you wish, you can loosen one end of the small metal strap allowing it to swing off the battery allowing easier removal. Note the + /- polarity position of the existing battery and replace with your new battery the same way. Reattach the small metal strap if necessary, reinstall the plastic retaining ring and reverse the steps for removing the case back to finish your job.
NOTE: Check and insure that the small O-Ring found on the case backs outer edge is in good shape and not torn or broken. If it is, it must be replaced to insure water resistance. You can find replacement parts here
Stem Pulled Out?
Sometimes the stem can come loose and pull away from the movement. If it is not broken when it does this, many times it simply can be re-attached. Here’s a YouTube video that shows how this is done.
https://youtu.be/2gK7J4f232k If you are uncomfortable with this process, take it to your local watch repair shop and they can do it for you.
Superleggera / Gauges
and IP Tips and Tricks
The Secret
The first secret to know about your new SL or IP gauge for your vehicle is that it is a two piece design! It may look to you as one piece - but it really is two pieces. Here is a picture of the two pieces shown apart:
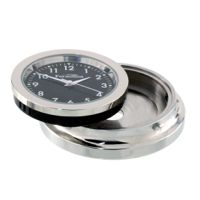
It's In Two Pieces
To separate the clock or the thermometer from the base, simply insert a blunt object into the small hole found on the base of the mounting plate. (The bottom is determined by the red and round sticky-disk with the hole in it) Gently push the blunt object in to the hole until you see or feel the gauge start to separate from the base. Don't push too hard, because you are pushing against the gauge's back and could damage it.
Setting the Time
Once the gauge starts to separate, it's best to finish removing it by your finger or fingernails. Once the "Press Fit" gauge is removed from its mounting plate, setting the time becomes obvious and is done exactly like your wrist watch: Gently pull the stem to set the time, and then push the stem back in to start the clock. Once you are happy with the time setting you can then re-insert the gauge back inside the mounting plate. Done!
Other Helpful Hints and Tips
Always remove the gauge prior to installation and mount the mounting plate first to your Car, Boat, Rod or Plane. Do this by removing the protective thin plastic covering from the mounting plates sticky-disk. Mounting these parts separately will allow you to easily line up the gauge insert for proper and level viewing.
When you are ready to insert your gauge back into its mounting plate, coat the rubber O-rings on the gauge with a little Vaseline or Chapstick. This will allow for easy future removal by hand for time setting or battery replacement.
When it's time to change the battery, simply remove the gauge from its mounting plate. The clocks has a press fit back plate that requires a special watch makers tool to pop off. Replace the battery and have the watchperson snap the clocks case back back on the gauge.
Changing the SL/IP battery
As it sounds, this cover is a press fit into the clock case. There are no visible tool grabs or markings on the case back, but there probably is a small notch on its side. It's small and you need to look carefully. This notch is provided to place a small jewelers knife in between the case's back and the case itself and wedge or pop the back off with a twist of the knife while in this notch. This back is common with our Press Fit and set screw mounted clocks. If you are a DIY person, changing the battery with this case-back can be frustrating. Why? Because the case-back is easy to pop off but tricky to put back on. We use a special watch-press to snap the back back on the case, but it can be done with thumbs (not the palm of your hand - you'll break the crystal) Hold one end down in place with one thumb and slide and press with the other thumb the other side and PRESS. Be patient. We said it's tricky! Our advice: Send it to us to change the battery and o-ring or your local watch shop - it's inexpensive and you'll be so less frustrated.
Want a tool: Makes it sooo much esier and the tool is not expensive. Here’s the Amazon link: https://a.co/d/2CgdgNW
Enjoy!
How to Set The Time On Your Clock
PLEASE NOTE: 2011 U.S. Regulations require all clocks be manufactured and shipped with the stem in the out position and the clock stopped. This is a change in how we have shipped our clocks in the past. Your clock may or may not have been shipped to you in this fashion. If your clock came to you not running, simply check for a plastic "chad" or "spacer" between the clocks stem crown (where you set the time) and the clocks case. If one exists, simply remove it, set the time, and press the crown in to start the clock. Thank you.
Pull out the stem carefully, and turn the stem to the correct time. Carefully push the stem back in to start the clock once the time is set.
Fresh batteries should last 3-4 years service life depending on the clocks internal movement.
Replacing a Broken Stem or Lost Crown on your Clock.
Over time your watch stem can wear out or break. Or, often after you decide to replace your watch crown, you may need a new stem to match the tap of the crown. Don’t let your old or broken stem keep you from wearing your watch; you can replace your watch stem yourself by clicking the link to this great guide from Esslinger.com (opens in a new window). For reference in purchasing movement parts like stems and crowns, most every Formotion clock (with exception for our POLICE SL model), uses the same Citizen / Myiota 2035 movement.
Be aware, replacing a watch crown involves a lot of precision since the new crown and stem must fit the watch case perfectly. If at any point you are concerned that this repair is more than you are comfortable dealing with please take your clock to a professional.
Compass Calibration
The Formotion Moto Compass has adjustable compensators in its base which will allow you to calibrate your compass, compensating for magnetic interference which could be found in the mounting area. All Formotion Moto Compass compensators have been set at the factory to the neutral position and may be perfectly calibrated right out of the box for your bike.
SORRY, WILL NOT WORK ON HONDA GOLDWINGS Ultras, Road Glides etc OR ANY BIKE with Stereo Speakers. It's the MAGNETS in the SPEAKERS that interfere with the magnets in the Compass!!
If you feel that you are getting magnetic interference that may cause false or inaccurate readings, follow the simple calibration instructions below. A full copy of these instructions is also included with the compass. Be sure to face your vehicle to TRUE North, East, South and West headings while doing steps 2,3,4 and 5 of the following instructions:
Compensating Instructions:
1. Hold compass in the desired mounting position.
2. Head NORTH, turn the N/S compensator screw very slowly until the dial reads "N".
3. Head EAST, turn the E/W compensator screw very slowly until the dial reads "E".
4. Head SOUTH, if the compass does not read exactly "S", turn the N/S compensator screw just enough to remove only half the error. EXAMPLE: if the reading is off 2 marks on the dial, then adjust it to make the dial read only 1 mark off.
5. Head WEST, if the compass does not read exactly "W" then follow the same instructions as in line 4 using the E/W compensator screw.
NOTE: Use only the adjusting tool or dime to adjust the compensating screws. DO NOT use a steel screw-driver (This will affect the compass magnets).
Mounting your Moto Compass
Mount the compass using the enclosed brass "L" bracket.
Secure the notched end of the L bracket to a 1/4 inch screw or bolt on the vehicle with the large opening of the bracket on top, ideally a windshield acorn bolt or switch housing screw.
Slide the compass stem bottom into the large opening on the L bracket. Once sitting atop the "L" bracket, slide the black plastic spacer over the compass stem and secure using the enclosed washer and short sockethead screw.
All our gauges are waterproof and the compass is no exception. Special consideration in wet conditions is unnecessary.
Remember; mount the compass as level as possible so that the rotating internal indicator does not hang-up on the glass and can spin freely.
Liquid Facts!
Liquid-filled gauges are generally preferred over dry gauges for two reasons: performance and ROI. Liquid-filled gauges are filled with a liquid, usually glycerin or silicone oil and are designed to perform optimally in less-than-ideal conditions. While Formotion's liquid-filled gauges are engineered to function in difficult environments, they’re also more economical from a long-term perspective: High heat, pulsation, or vibration lead to instrument breakdown, but Formotion's liquid-filled gauges stand up to these harsh conditions.
Liquid Filled vs. Traditional Gauges
The primary reason for gauge failure is vibration. In traditional dry gauges, delicate links, pivots, and pinions are prone to damage from vibration, leading to inconsistent performance. In a liquid-filled gauge, the fluid fill effectively dampens system pulsation, making the gauge pointer easier to read.
Likewise, humidity and moisture pose problems for dry gauges. Condensation can make a gauge difficult to read or, in some cases, can cause failure due to icing. Liquid-filled gauges, though, are sealed to prevent internal condensation, and by keeping moisture out of the system, gauge movement is protected during icing conditions.
The choice of fill fluid is based on the application, but glycerin is typically used for room-temperature applications and silicone oil is commonly used for extreme temperature applications, especially when icing is a problem. An oil with insulating properties is ideal if the system has exposed electrical contacts.
Why Is There An Air Bubble In My Liquid Filled Gauge?
This entry was posted on DirectMaterial.com's site February 2, 2016 by Jonathan Danforth and equally applies to Formotion's Liquid filled gauges.
Liquid filled gauges are the cat’s pajamas. They are the bee’s knees.
There are a number of reasons why they are fantastic. To start with, the liquid inside dampens the effects of pulsation and pressure spikes, lubricates the gauge’s moving parts so that everyday friction is reduced, and helps prevent internal corrosion among other things.
One question that we occasionally hear from some of our customers is if it is normal and necessary to have are air bubbles in liquid filled pressure gauges?
The answer is yes.
It is normal and necessary for liquid filled pressure gauges to have air bubbles in them.
There is nothing wrong with the gauge, the air bubble is intentional.
The air bubble is needed for the purpose of dampening the internal pressure to ensure accurate readings. It is necessary for the air bubble to be there so that the gauge will work properly since air provides a cushioning effect for the gauge.
In fact, you should be worried if there isn’t an air bubble.
How do I replace (or fill-up) the oil In My Liquid Filled Gauge?
Have a liquid filled gauge showing an air bubble / air pocket and it's bumming you out? First your gauge is fine - it will run and be accurate with or without the oil encapsulation (see above). The oil is there for vibration resistance and will not affect the accuracy of the unit with it or without it. Second, it may have lost this oil because the case-backs o-ring deteriorated over time or the case back itself became loose from the case. The o-rings should be replaced on Signature thermometers ONLY if oil loss is evident or internal air bubbles become present. What to do? Two things you can do.
1) Remove the case-back from the case and empty the oil completely. Replace the o-ring and reattach the case-back to the case. Viola - no oil no bubble.
2) With the case-back removed (and the case-back set aside - with a new o-ring in place) place the gauge in a vessel that will allow you to submerge the entire gauge in oil as well as allow your hands access to re-attache the case-back once re-filled and while still submerged. Fill the vessel with a good silicone oil (NOT organic - it will yellow as it degrades). We recommend using a good grade light to medium viscosity pure silicone fluid: Chemical Name: Polydimethylsiloxane Fluid / PDMS Silicone Oil. Some brands include: RHODORSIL®.
Fill the vessel until it completely covers the gauge. Let the gauge sit in the oil overnight to flush all air bubbles that may be present. While still submerged re-attach the case-back as tight as you can. Gently remove the gauge from the oil and tighten properly and remove excess oil from the outside of the unit.
Why Choose Formotion Stainless Steel Gauges Over Our Competitors Cheaper Aluminum Made Gauges
Corrosion. Stainless steel is made up of iron, chromium, nickel, manganese and copper. The chromium is added as an agent to provide high corrosion resistance. Also, because it is non-porous the resistance to corrosion is increased. When aluminum is oxidized, its surface will turn white and will sometimes pit. In some extreme environments, Aluminum may corrode rapidly with catastrophic results.
Thermal Conductivity. Aluminum has a much better thermal conductivity (conductor of heat) than stainless steel. One of the main reasons it is used for car radiators and air conditioning units. The problem is, thermal conductivity is NOT what you want when it houses an instrument with sensitive components like a watch movement or temperature sensitive components like a thermometer.
Cost. Aluminum is typically cheaper than stainless steel and is a main reason why our competitors gauges are less expensive. Internal components vary greatly too. We use only Citizen / Myiota Movements and professional grade German bi-metal thermometer internals in our gauges.
Thermal Properties. Stainless can be used at much higher temperatures than Aluminum which can become soft and loosen its tolerances as temperature increases.
Strength. Stainless steel is stronger than Aluminum giving you years of uninterrupted service. That’s why our customers say they will be “handing down” their Formotion gauges to their offspring!
This is a custom payment gateway. You may have been directed here by email or phone conversation to make a secure payment for a custom service or product purchase. Use this payment gateway to make that payment securely.